
BMW X5: Torque Converter Bearing
REPLACING TORQUE CONVERTER SHAFT SEAL (GA6HP26Z)
Special tools required:
- 00 1 450
- 24 0 200
- 24 2 351
- 24 2 352
- 24 2 353
- 24 2 360
Necessary preliminary tasks:
- Remove automatic transmission.
IMPORTANT: After completion of work, check transmission oil level.
Use only approved transmission oil.
Failure to comply with this instruction will result in serious damage to the transmission.
Secure transmission with special tool 24 0 200 to assembly stand 00 1 450.
Remove torque converter.
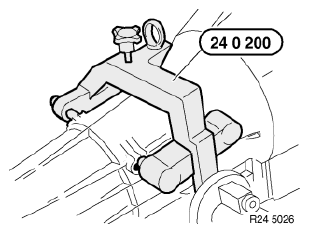
Fig. 29: Identifying Special Tool (24 0 200)
Attach special tool 24 2 353 to drive shaft (1).
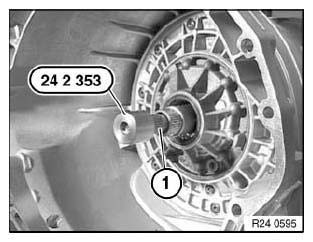
Fig. 30: Identifying Special Tool (24 2 353)
Screw in special tool 24 2 351 until it is firmly connected with shaft seal.
Screw in special tool 24 2 352 to remove shaft seal.
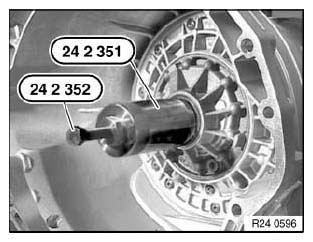
Fig. 31: Identifying Special Tool (24 2 351) And (24 2 352)
Oil sealing lip on shaft seal.
Drive in shaft seal (1) with special tool 24 2 360 as far as it will go.
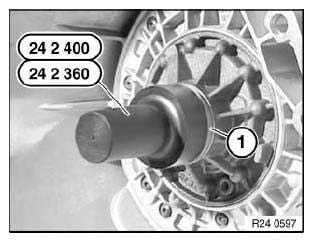
Fig. 32: Identifying Special Tool (24 2 360)
READ NEXT:
 Extension Housing, Bea
REPLACING OUTPUT FLANGE SHAFT SEAL (GA6HP26Z)
Special tools required:
23 0 490
24 4 310
IMPORTANT: After completion of work, check transmission fluid level.
Use only the approved transmission flui
Mechanical Attachments
REPLACING SELECTOR SHAFT SEAL (GA6HP26Z)
Special tools required:
24 5 361
24 5 362
24 5 364
24 5 366
IMPORTANT: After completion of work, check transmission fluid level.
Use only the approved t
Oil Pump
REPLACING TORQUE CONVERTER SHAFT SEAL (GA6HP26Z)
Special tools required:
00 1 450
24 0 200
24 2 351
24 2 352
24 2 353
24 2 360
Necessary preliminary tasks:
Remove automatic transmission.
IM
SEE MORE:
Replacing Seal For Slide/Tilt Sunroof Lid At Rear
Necessary preliminary tasks:
Open glass slide/tilt sunroof
NOTE: Follow repair instructions for bonded seals on glass slide/tilt
sunroof.
Detach seal (1) from slide/tilt sunroof lid.
Installation:
Clean bonding surface with adhesive remover (sourcing reference: BMW Parts
Service).
Press seal w
Assisted Driving View
Principle
Depending on the equipment, information about
the driver assistance systems is displayed in an
animated surrounding area of the vehicle when
driver assistance is active.
General information
Depending on the settings, Assisted Driving
View can be displayed permanently or temporarily
with ac
